Wednesday, June 30, 2010

Let HIM eat CAKE!


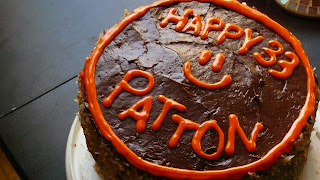
Yeah yeah yeah - I know I haven't posted in a while. It's not that I haven't been a cookin' fool - it's just that I ... well... have been a bit busy. If you'd like to keep up with the 'business' you should check out my casual blog (less food, more me). Anyways - since my boyfriend's birthday is TOMORROW I decided to be a good little domestic and bake him a german-choc. cake COMPLETELY FROM SCRATCH... because, of course, that is how I roll. :D
I looked for a good two evenings worth of time looking for the perfect 'cake' recipe... there were a ton of really tasty ideas - some were more 'out there' than others... like this one... but the winning 'base' recipe was this one - supplied by Saveur Magazine. It's tasty looking and semi-cheap on a poor college student's budget. But you really need to pay attention to the directions and don't just dump everything into one bowl because this recipe combines all the ingredients for the cake and frosting.

Ingredients:
3 cups sugar
1 3/4 cups unsalted butter, softened
2 1/2 tsp. vanilla extract
8 large egg yolks
1 12-oz. can evaporated milk
1 1/2 cups roughly chopped pecans
1 7-oz. package sweetened shredded coconut
4 oz. German's Sweet Chocolate, chopped
2 oz. unsweetened chocolate, chopped
2 cups flour
1 tsp. baking soda
1/4 tsp. kosher salt
1 cup buttermilk
4 large egg whites

What'cha need to do to make said cake:
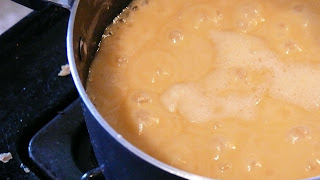
1. Combine 1 1/2 cups sugar, 3/4 cup butter, 1 1/2 tsp. vanilla, 4 egg yolks, and evaporated milk in a 2-qt. pan over medium heat. Bring to a simmer; cook until thick, 12 minutes [it takes a while so be patient - just don't burn it or it will taste gross]. Strain through a sieve into a bowl; stir in pecans and coconut; chill frosting until firm (put it in the fridge).


2. Heat oven to 350°. Grease three 9" round cake pans with butter; line bottoms with parchment circles. Grease parchment; set aside. Put chocolates into a small bowl; pour in 1/2 cup boiling water; let sit for 1 minute. Stir until smooth; set aside. In another bowl, whisk flour, baking soda, and salt; set aside.

3. In a standing mixer, beat 1 1/4 cups sugar and remaining butter until fluffy; add remaining egg yolks one at a time. Add chocolate mixture and remaining vanilla; beat until smooth. On low speed, alternately add flour mixture and buttermilk until just combined; set batter aside.

4. Meanwhile, whip egg whites to soft peaks. Add remaining sugar; whip to stiff peaks. Fold egg whites into batter; divide between pans and smooth batter. Bake until cakes are set, 25–30 minutes.

5. Let cakes cool [they will contract away from the sides of the pan by about 2%] frost the top of each cake and assemble, leaving the sides bare [iffy].


Mah Changes:
To the icing - I put more coconut in it than it called for.. because let's face it - coconut is dang tasty!
I didn't use kosher salt because regular table salt worked just fine and I didn't need to be spending 5 dollars on a little stupid thing of salt that just had the name 'kosher' on it.
Also, I used semi-sweetened chocolate instead of unsweet...because it was on sale. To balance that out I added about 3 tbs of unsweetened coco after I mixed everything together just to give it an extra KICK!
On the subject of 'on sale' I used a buttermilk powder - since I had a jar of it lying around just begging to be used. Trust me, a jar/container of that stuff lying around makes baking a whole lot easier. I can't tell you how many times I've tried to bake/make something and I get all of the ingredients together ... start cooking and then come to find out that I don't have any buttermilk. Problem solved. Plus that stuff has a massive shelf-life.
Being that I don't generally line the bottoms of my cake pans with parchment paper - I found this task to be quite tricky, until I figured out the easy way to do it.spray the bottoms of your pans - stick some paper in there, press it down along the bottom (the sides will get crinkly) and then using A VERY SHARP knife just cut along the walls of the side of the pan.
Most importantly - if you put all 3 pans in at once, MAKE SURE THAT ALL OF THEM ARE DONE BY THE TIME THE BUZZER GOES OFF. I had one pan that the center wasn't done in so I had to put it back in for another 10-12 minutes. Gotta love heat distrubution.
Let the cakes cool for a couple of hours, I left them in the pan while I went to work for 5ish hours and came back and then assembled the cake. Reason being is because when the hot cake meets the cool/cold icing - you get condensation which makes the cake all gushy on the outsides... blah. You want it moist but not soggy. lol.
It also says that you should leave the sides bare on the cake, you don't have to if you don't want to. Go against the man and ice the whole thing! REBELLION OF ICING!
And a little tip - make it the day before you are going to eat it, it does wonders - flavor-wise.


... so yeah - that'd be the cake. What's for dinner, you ask? I'll tell you later- but let me assure you - it's going to be delicious!

As always

CCC me cooking!

Sunday, May 2, 2010

Pizza Puffs

Pepperoni Pizza Puffs

Adapted from Noble Pig

  • 3/4 cup flour
  • 3/4 teaspoon baking powder
  • 3/4 cup whole milk
  • 1 egg, lightly beaten
  • 2 Tablespoons chopped olives
  • 4 ounces mozzarella cheese, shredded (about 1 cup)
  • 4 ounces pepperoni, cut into small cubes (about 1 cup)
  • 1/2 cup pizza sauce
  • 2 Tablespoons sliced green onions
  1. Preheat oven to 375o.
  2. Grease a 24-cup mini muffin pan.
  3. In a large bowl, whisk together the flour and baking powder; stir in the milk and egg.
  4. Stir in the cheese, olives, and pepperoni; let stand for 10 minutes.
  5. Stir the batter and divide among the mini-muffin cups.
  6. Bake until puffed and golden, about 25 minutes.

Microwave the pizza sauce until warmed through. Sprinkle the tops of the puffs with the green onions. Serve the puffs with the pizza sauce for dipping.

I see SCONES!

INGREDIENTS

4 cups plus 1 tablespoon all-purpose flour

2 tablespoons sugar, plus additional for sprinkling

2 tablespoons baking powder

2 teaspoons salt

3/4 pound cold unsalted butter, diced

4 extra-large eggs, lightly beaten

1 cup cold heavy cream

3/4 cup fresh blueberries

1 egg beaten with 2 tablespoons water or milk, for egg wash

Preheat the oven to 400 degrees F.

In the bowl of an electric mixer fitted with a paddle attachment, combine 4 cups of flour, 2 tablespoons sugar, baking powder, and salt. Blend in the cold butter at the lowest speed and mix until the butter is in pea-sized pieces. Combine the eggs and heavy cream and quickly add them to the flour and butter mixture. Combine until just blended. Toss the fresh strawberries /blueberries/anyberry with 1 tablespoon of flour, add them to the dough, and mix quickly. The dough may be a bit sticky.

Dump the dough out onto a well-floured surface and be sure it is well combined. Flour your hands and a rolling pin and roll the dough 3/4-inch thick. You should see lumps of butter in the dough. Cut into squares with a 4-inch plain or fluted cutter, and then cut them in half diagonally to make triangles. Place on a baking sheet lined with parchment paper.

Brush the tops with egg wash. Sprinkle with sugar and bake for 20 to 25 minutes, until the outsides are crisp and the insides are fully baked.


Oh it's soooo tasty

Wednesday, October 21, 2009

Tomato Lasagna!

So everybody likes lasagna, but this one is a little different - simpler and easier to make, and without all the greasy meat business. A bit lighter, if you will. It's got a simple white sauce (bechamel) to stand in for the ricotta, tomato sauce, some cheese and the pasta. That's it. Tasty though. Here goes:

Tomato Sauce:
1/3 cup olive oil
3 cloves garlic, peeled but left whole
salt
4 (14 oz) cans diced tomatoes
~12 basil leaves, torn
1 c. hot water

Bechamel sauce:
1/4 lb plus 1/2 tablespoon butter
2/3 c. all purpose flour
4 cups milk, warmed
salt and freshly ground black pepper
freshly grated nutmeg

1 package lasagne noodles
grated parmesan cheese - I end up using about a pound for a batch, you can use less, but what's life without lots of good cheese?

For the tomato sauce, heat the oil and garlic in a large pan. When you
begin to smell the garlic, add the tomatoes and a good pinch of salt
and bring to a boil. Lower the heat and cook uncovered for 20 to 25
minutes. Add the basil and 1 cup hot water towards the end of the
cooking time. Puree until smooth if you feel like it, but I left it chunky and it has a nice texture that way.

To make the bechamel, melt the buttter in a small saucepan over low
heat. Whisk in the flour and cook for a few minutes, stirring
constantly, then begin adding the warm milk. It will be immediately
absorbed, so work quickly, whisking with one hand while adding
ladlefuls of milk with the other. When the sauce seems to be smooth
and not too stiff, add salt, pepper, and a grating of nutmeg and
continue cooking, even after it comes to a boil, for 5 minutes or so,
mixing all the time. It should be a very thick and smooth sauce.

Preheat the oven to 350 and grease a deep big rectangular baking
dish. Drizzle some bechamel over the bottom of the dish to cover it
very thinly. Put a slightly overlapping layer of lasagne noodles on
top. Dollow think layer of tomato sauce over that, spreading it with
the back of the ladle. Add about two ladlefuls of bechamel in long
drizzles and then cover with a sprinkling of parmesan. Add another
layer of lasagne noodles, then tomato, bechamel, and parmesan as
before, and then repeat the layers. You should have
about 4 tablespoons of tomato sauce and a good amount of bechamel
left. Make a final layer of lasagne noodles and cover with all the
remaining bechamel. Apply the tomato sauce here and there and
sprinkle with any remaining parmesan. Bake for about 30 minutes, or
until it is bubbling and golden on top.

Saturday, October 17, 2009

Chicken Chili KABLAM!!!

Since the weather has finally (and semi-consistantly) begun to turn cold, what better than to cozy up with friends... and a amazing bowl of chicken chili w/ sweet cornbread. Basically - I pulled this recipe out of thin air... I've never really made a chili before, much less a chicken chili so this was shear luck that I pulled this off. YAY FOR EXPERIMENTING!


Ingredients for the chili -

  • 4 chicken breasts – boneless and skinless

  • 1 can of pinto beans

  • 1 can of chili beans

  • 1 can of red kidney beans (rinsed)

  • 2 cans of diced tomatoes

  • 2 cans of tomato paste (small can)

  • ½ of a large red onion – chopped

  • ½ of a green pepper- chopped

  • 1 – 10oz bottle of chili sauce.

  • ½ cup of vegetable oil

  • 3 tbs of red chili powder

  • 2 tbs of coriander powder

  • 2 tbs of cumin powder

  • 1 cup of water

  • Salt and pepper to taste


  1. Bring a medium pot of water to a boil. Place chicken breasts in and poach.

  2. In another pot, combine the all the other ingredients and bring to a high heat (even a slight boil). Stir for about 5 minutes then turn the heat down and let simmer for a good 20 minutes.

  3. Check the chicken – when it's done it will be white and juicy – use a knife to slice it down the middle to check and see if it's white thru-and-thru.

  4. Once the chicken is done, take it out – place it on a cutting board and shred the chicken with two forks. After you have the chicken shredded – place in the pot w/ the rest of the chili and then continue to simmer for about 15-20 more minutes. This way all the lovely flavors of the chili infiltrate the chicken. (HA I just said infiltrate and chicken in the same sentence.)

  5. Turn off burner, serve in bowls, top with cheese and a piece of cornbread [see recipe below]. ENJOY!


Ingredients for cornbread

  • 2 boxes of JIFFY cornbread

  • ¼ cup of sugar

  • 1 can of corn


  1. Pre-heat the oven to 400.

  2. In a bowl – prepare the cornbread batter like it says on the back of the box.

  3. Add the sugar and corn – stir till everything is even.

  4. Grease pan [9x13in] (best if it's a glass/pyrex dish) and add batter.

  5. Bake for 25-30 minutes or until the top is golden brown. Cut, serve, and enjoy!


I hope you like this recipe... and even though you may have your doubts about chicken chili - it's HEALTHIER than regular, and just as good... not to mention FILLING... No joke - I could only eat one bowl and I was stuffed!

PS. NEIL YOU NEED TO POST THE LASAGNA RECIPE!

Tuesday, October 6, 2009

Chicken Corn Chowder!

The chicken corn chowder recipe is really really easy (and really good if you're in need of some comfort food).
You'll need:
1 can of creamed corn
1 can of sweet corn
1 can of chicken broth
1 can of cream of chicken soup
1 packet of instant mashed potatoes (either sour cream & garlic, or cheddar)
3 medium sized chicken breasts (boneless)
2 cups of water
1/2 cup of milk
Salt, pepper, and powdered garlic - to taste.

First - you want to get a pot and fill it half way full of water, bring that to a boil and then put your chicken breasts in (you can also add some spices if you would like the chicken to have a zing - I find that adding lemon zest works really well). Also, poaching the chicken keeps it especially nice and juicy. Let that boil away until the chicken is done - should take about 15-20 minutes depending on the thickness of the chicken breast.

Next - while your chicken is taking a nice relaxing spin in the 'hot tub,' combine the creamed corn, sweet corn, chicken broth, cream of chicken soup, instant mashed potatoes, milk, and water in a crock pot - set it to high heat and give it a good 2 minutes of stirring, to insure that all the ingredients are mixed well. Let that simmer away. The reason why you use the instant potatoes is so you give it a nice potato soup base... if you find that the mix is too thick - add more water.

Once your chicken is done, take it out and place it on a cutting board, then with two forks shred the chicken in to bit-size shreds, add the chicken to the chowder base and let it simmer for 15 minutes and then enjoy. If you have more time to let it simmer - creamier it will taste.

Saturday, September 26, 2009

Sweet and Savory!

So Wally-World had a sale on the salmon fillets - 4 for 4 dollars (what a bargain)... so guess what I made? Baked Salmon w/ a honey, lemon, and pepper glaze - which is really simple to make and uber delicious!

What you'll need: honey, lemon (or lemon juice), pepper (fresh and in a grinder preferably), extra virgin olive oil, and salmon.

  1. Preheat your oven to 375°F, take a glass dish (big enough for as many fish as you have), put enough oil in the bottom to barely coat the bottom of the dish.
  2. Make sure your fish is thawed - don't cook it when it's frozen. place it skin side down (or the flat side down). Lightly sprinkle some oil over top and rub it in.
  3. Take your lemon juice and apply generously to the salmon fillets. Next take your honey and give the top a nice coating of honey (this will also help keep the pepper and lemon zest on top of the salmon). Lightly coat the top with pepper and take the lemon you just used and grate the top a bit so you have some lemon zest to sprinkle on top of everything.
  4. Pop it in the oven for 10-13 minutes, until you can easily flake the salmon apart with a fork.
  5. When you're plating the salmon add a line of honey along the top, then sprinkle with a bit of pepper or parsley. It's adds a bit more sweetness (in case all of the honey melted off while it was baking.
  6. Enjoy!
See - simple. I find that rice and steamed veggies go best with this dish. But if you're on a budget noodles (even ramen) go well with it - just drain the noodles REALLY well and then add a bit of butter. Put the noodles down first then top with the salmon.

I'll post more recipes this week... including the pizza ones from a few weeks ago. (sorry guys I've been busy.)

Sincerely,
C.C.C. me cooooking!!!!
aka Stf


I hope this works for you guys.